
because mincepies and memories go togther
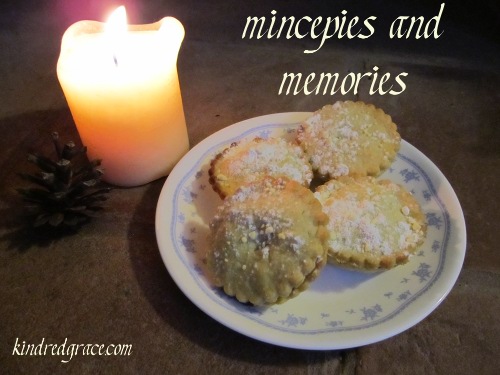
Mincepies are unsophisticated, homely and above all, tasty mouthfuls of comfort and joy.
I love their simplicity and the surprise and delight of biting through dusty, dry pastry into sweet, spicy fruit. Traditional Christmas fare in England, I think they’re tasty at any time, but there’s something about their appearance and aroma that makes me want to take a walk through the frozen countryside, brown and barren under a blue sky and wintry sun, then curl up by the fire to thaw my toes and dream.
Mincepies, moreover, evoke memories of grandparents and cousins, uncles and aunts, parents and siblings sitting around my grandparents’ dining room table, the dusk falling outside and the lights twinkling inside, eating mincepies with cream and talking. They represent the kinship which is one of my favourite things about my family – the characteristics and features we share, the memories we remember, the unity in spite of our differences that we nurture with lots of food and words.
Oh, yes, we always talk in my grandparents’ home and we almost always don’t agree!
God. History. Politics. Art, music and literature. We talk about it all! We share stories of the old days when the children were little and memories of the good times when the oldest grandchild (aged 29 now) was little and the latest exploits of the youngest grandchild (aged four now), who is into everything. We recalls dogs, past and present. And, of course, debate the best way to eat mincepies.
Eating mincepies is fun, but baking mincepies is better, a creative expression that gives me a deep sense of contentment and continuity as I think of my mother and grandmother baking before me and of the seasons that come and go and return.
Why not make some mincepies and memories of your own?
Mincemeat
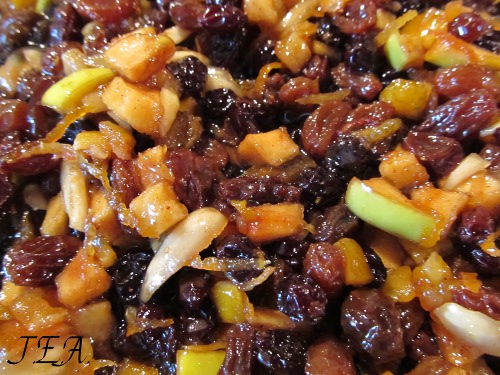
Mincemeat is the main ingredient of mincepies. In England, it's sold in supermarkets. I made mincemeat at home for the first time this year when I was inspired by this recipe by Delia Smith. It was easy and delicious and I've adapted it a little bit (and translated it into American measurements) to share here...
Ingredients
- 2 Fist-Sized Tart Apples
- 1 Cup Shredded Suet
- 1 1/2 Cups Raisins
- 3/4 Cup Sultanas (or Golden Raisins)
- 3/4 Cup Currants
- 3/4 Cup Chopped Mixed Candied Peel
- 1 1/2 Loosely Packed Cups Dark Brown Sugar
- 1/2 Cup Almonds
- 1 Lemon
- 1 Orange
- 2 Teaspoons Ground Mixed Spice
- 1/4 Teaspoon Ground Cinnamon
- 1/4 Teaspoon Ground Nutmeg
- 3 Tablespoons Brandy (Optional)
Instructions
Wash, don't peel, the apples and chop them into pieces no bigger than your baby fingernail. Pick over the dried and candied fruit and discard any stalks and stones. Blanch the almonds and chop into slivers. Zest and juice the lemon and orange.
In a large bowl, mix everything except the brandy together, enjoying the aroma as the fruit and spices come together. Stir everything thoroughly then cover the bowl and leave it in a cool, dark place overnight to give the flavours a chance to mingle.
Next day, stir the mincemeat again, then cover the bowl with foil and place it in a cool oven until the suet melts into fat. Stir it again and then leave the mincemeat to cool. Don't worry about the colour and texture of the fat as it cools and hardens, just stir it in, it's fine. Stir the brandy in when the mincemeat is cool.
Either use the mincemeat to make mincepies now or pack it into steralised jars to use later. Don't forget to label the jars with the name and date! Store the jars in a cool, dark place. Without the brandy, keep the mincemeat in the 'fridge and use it in a few weeks, but with the brandy it should last for six months or a year.
Just in case you don’t have a recipe for home-made pastry or the time to buy ready-roll pastry, here’s a recipe, the one I use …
Pastry
Ingredients
- 3 Cups White Flour
- 1 1/2 Cups Butter or Margarine
- Pinch Salt
- Pinch Baking Powder
- 6 Tablespoons Cold Water
- Extra Flour
- Extra Butter or Margarine
- A Cup of Milk
- Icing or Confectionery Sugar
Instructions
Toss the flours together with the salt and baking powder.
Shake the flours through a coarse sieve so they're fine and smooth. (You can skip this step if you're short of time or cooking with little people who will seize it as an excuse for a flour fight!)
Rub the flour and butter together with the very tips of your fingers to resemble fine breadcrumbs.
Slosh the water into the “breadcrumbs” a tablespoon at a time and stir roughly together. Stop adding water if the dough gets soggy. A spoon is all wrong for this job. Lots of people use a table knife. I always use one finger so that I can gauge the consistency of the dough as I mix.
The mixture will go cold and gluey and then you'll find that it's coming together into a rough dough.
When it holds together, turn it out onto a floured surface and knead it, for just a few strokes until it's smooth.
And then stop, because if you keep kneading it, it'll go hard and tough!
Mincepies
You have your mincemeat and your pastry ready. Here’s what you do next …
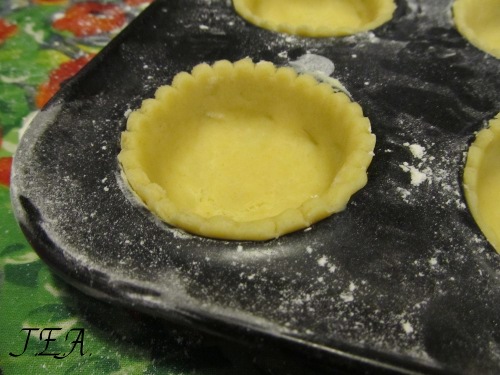
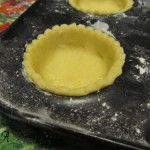
Grease and flour each of the twelve “holes” in a patty tin. The “holes” should be roughly two inches wide by one inch deep. The “holes” in a cupcake or muffin tin are huge by comparison!
Sniff the mincemeat and think how lovely it smells! Seriously. It’s one of my favourite kitchen aromas …
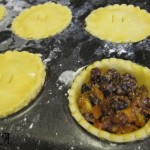
Now split the pastry into two thirds. On a floured surface roll the larger lump into a quarter of an inch thickness. Use a round cookie cutter (roughly three inches wide) to cut twelve mincepie bottoms. Ease each of them into a “hole” in the patty tin. Use a slightly smaller (preferably fluted – it looks prettier!) cookie cutter to cut twelve mincepie tops.
And this next bit is the fun bit!
Take a spoonful of mincemeat and pop it into the nearest mincepie pastry case. Don’t heap the mincemeat over the top of the pastry case or the mincemeat will ooze out and over the tin! Dip a finger in a cup of milk and run it round the top of the pastry case. Choose a mincepie top. Dip another finger in the cup of milk and run it round the edge of the pastry circle. Now pop the pastry circle, milk down, over the mincemeat. Use the very tips of your fingers to crimp the edges of the top and the bottom together. Finally use the tip of a table knife to poke two little holes in the top of the mincepie for steam to escape while cooking.
And do that again and again and again until each of the “holes” in the patty tin contains a little mincepie!
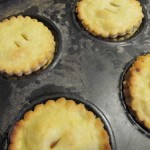
Bake the mincepies in a moderate oven until the pastry looks golden and ever-so-slightly flaky and the mincemeat is oozing out of the holes in the top of the mincepies. Use two forks to ease the mincepies out of the patty tin and onto a cooling rack.
Take a handful of icing or confectionery sugar and scatter it over the mincepies before they cool.
Don’t forget to grease and flour the “holes” in the patty tins again between cooking each batch of mincepies. Making mincepies, once you’ve started, is easy and rhythmic. You can ring the changes by using pastry hearts or stars or angels for the tops.

Eat mincepies warm from the oven or cold, with cream or without, any day between now and New Year’s Day.
If you make this quantity of mincemeat and pastry, then you’ll use about half the mincemeat and make about twenty-four mincepies. So what do you do with any leftover mincemeat? (Other than make more mincepies …)
My grandmother and mother like to line a long, thin, shallow pie dish with pastry, fill it two thirds with apples like an apple pie, then one third a thick, generous layer of mincemeat. They top the mincemeat with a pastry lid (don’t forget the steam holes!) and bake it like an apple pie. It’s delicious dusted with icing or confectionery sugar and served hot from the dish with custard and cream. Yummy!
Have a fun and merry Christmas!
What fun–thank you for sharing with us, Elisabeth! Merry Christmas!
You’re so welcome, Kiersti! 🙂 Happy New Year!